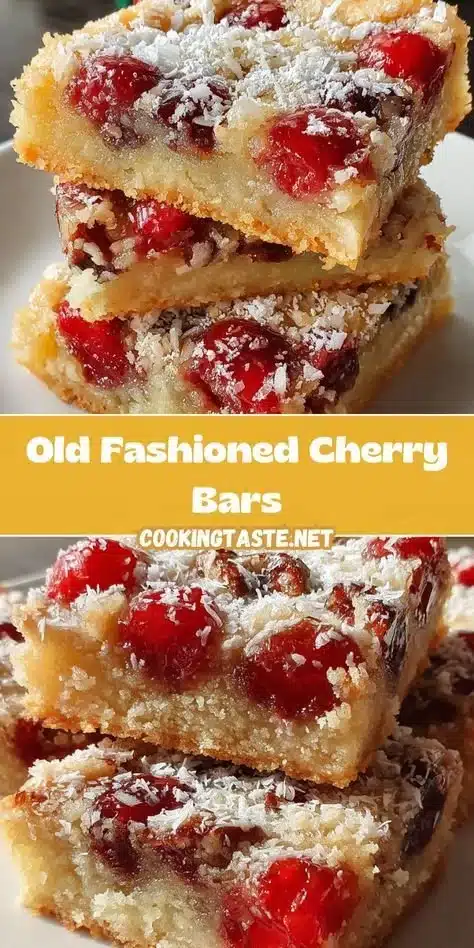
I remember the first time I tasted Old-Fashioned Cherry Bars. It was one of those lazy summer afternoons in Asheville, where the air was thick with the sweet smell of blossoms. My grandmother had just come back from the orchard, her apron dusted with flour and her eyes twinkling, already bustling around the kitchen. She always knew how to turn a simple gathering into a memorable feast. That day, she was preparing her famous cherry bars, a recipe passed down through generations—just like her laughter and wisdom.
The moment those bars came out of the oven, the kitchen transformed. Our little home filled with the intoxicating scent of warm cherries and buttery crust, and I could hardly contain my excitement. Each bar was a slice of happiness, perfectly tart and sweet, showcasing the cherries that sang of summertime. I watched with wide eyes as my grandma sliced them into squares, sprinkling a little powdered sugar on top. The first bite was like a hug from the inside, warm and comforting, enveloping me in memories that felt like they had been made just for me.
Even now, as I replicate her recipe in my own kitchen, I feel the weight of her history in every cherry I pit and every crumb I sprinkle. Old-Fashioned Cherry Bars are not just a dessert; they are a connection to family, to love, and, above all, to the joy of sharing a homecooked treat with those you hold dear.
Flavor and Popularity
The Unique Flavor Profile of Old-Fashioned Cherry Bars
Old-Fashioned Cherry Bars are truly a celebration of flavors. The combination of sweet, tangy cherries melds perfectly with a buttery, rich crust, creating a beautiful balance that dances across your palate. Each bite delivers a burst of juiciness from the cherries, complemented by a pleasantly crumbly texture that melts in your mouth. The hint of almond extract adds a delicate nutty note that elevates the dessert to a whole new level. It’s a nostalgic flavor, reminding many of warm afternoons spent with family and friends.
What’s remarkable about these cherry bars is how versatile they are. Depending on your preference, you can play with the sweetness levels, adding just enough sugar to highlight the cherries without overpowering them. They are an inviting treat that welcomes simplicity, yet with the right touch, they become a show-stopper for gatherings.
Why This Recipe Is a Family Favorite and Crowd-Pleaser
I can’t count the number of family gatherings where Old-Fashioned Cherry Bars took center stage. Their vibrant color draws you in, while the delicate aroma invites you to take a bite. These bars never fail to impress; guests often ask for the recipe, eager to recreate that comforting experience in their own homes.
The versatility of Old-Fashioned Cherry Bars also contributes to their popularity. They suit any occasion—be it a summer picnic, holiday celebration, or even a cozy weeknight dessert. They can be served warm, at room temperature, or even chilled, making them the perfect candidate for any moment that calls for a sweet treat. The shared enjoyment of such a classic dessert fosters connection and conversation, making those moments around the table all the more special.
Ingredients and Preparation
Essential Ingredients and Possible Substitutions
To make Old-Fashioned Cherry Bars come to life, gather these essential ingredients:
Cherries: Fresh pitted cherries are ideal for that juicy burst, but you can substitute with frozen cherries if fresh ones are out of season. Just make sure to drain them well to prevent excess moisture.
Butter: Use unsalted butter for controlled seasoning; the creaminess plays a crucial role in the texture of the crust.
Sugar: Granulated sugar sweetens the cherry filling, while brown sugar can add a rich depth to the crust if you’d prefer.
Flour: All-purpose flour is perfect for this recipe; it gives those bars the structure needed to hold the filling without being too dense.
Eggs: They help bind the mixture together, ensuring that each bite is cohesive and delightful.
Almond extract: A little goes a long way in enhancing the cherry flavor, bringing a lovely aromatic nuttiness to the dish.
Powdered sugar: A light dusting on top not only adds elegance but also introduces a delightful sweetness that compliments the tartness of the cherries.
Possible Substitutions
If you’re looking to modify the recipe, don’t hesitate! You can substitute half of the butter with coconut oil for a more tropical flair, or even use gluten-free flour if you prefer a gluten-free option. Swapping the cherries for blueberries or even raspberries offers a delightful twist, allowing you to tailor this recipe to your tastes. Each variation brings its own charm while still keeping the essence of the Old-Fashioned Cherry Bars intact.
Step-by-Step Recipe Instructions with Tips
Creating Old-Fashioned Cherry Bars is a rewarding and straightforward process. Follow these steps to ensure your bars are a resounding success:
Preheat the Oven: Start by preheating your oven to 350°F (175°C). This ensures your bars bake evenly and develop that gorgeous golden color.
Prepare the Pan: Grease a 9×13-inch baking dish with butter or line it with parchment paper for easy removal later.
Make the Crust: In a large mixing bowl, beat the softened butter and sugar together until creamy. Blend in the eggs and almond extract, mixing well. Gradually add the flour and stir until a dough forms.
Layer the Base: Press about two-thirds of the dough into the bottom of the prepared pan, creating an even layer. Use damp hands to prevent sticking.
Prepare the Cherry Filling: In another bowl, mix the pitted cherries with sugar and a touch of lemon juice to brighten up the flavors. Pour this mixture over the crust layer, spreading it evenly.
Top It Off: Crumble the remaining dough over the cherry filling, leaving some gaps to let the filling peek through.
Bake: Place the pan in the preheated oven and bake for about 35-40 minutes, or until the top is golden brown and the filling is bubbling beautifully.
Cool and Serve: Allow the bars to cool completely in the pan before dusting with powdered sugar and cutting into squares.
A helpful tip: If you want to elevate the flavors even further, consider adding a pinch of cinnamon or nutmeg to the cherry filling for that extra warmth reminiscent of grandma’s old recipes.
Cooking Techniques and Tips
How to Cook Old-Fashioned Cherry Bars Perfectly
Cooking is an art, and Old-Fashioned Cherry Bars are no exception! Ensuring you have the right technique can lead to those mouthwatering results you desire. The oven’s temperature plays a crucial role—too hot, and you risk burning the crust; too cool, and you may find soggy bottoms.
Using fresh cherries will always yield the best flavor and texture, but frozen can be just as good if handled properly. Thaw them ahead of time and drain off excess moisture. This will help avoid a soggy crust, keeping that delightful crunch that makes each bite a joy.
Another important aspect is cooling time. I know it’s tempting to dive into the warm bars straight out of the oven, but allowing them to cool ensures they’re easier to slice and lets the flavors meld beautifully. Trust me; patience will reward you in the end!
Common Mistakes to Avoid
Even the best of us make mistakes in the kitchen! Here are some common pitfalls to watch for when making your Old-Fashioned Cherry Bars:
- Overmixing the Dough: This can result in tough bars instead of the desired tender texture. Mix until just combined to keep them soft and crumbly.
- Using Too Much Liquid: If you don’t drain your cherries or use fresh ones with high moisture content, your bars may turn out soggy. Always make sure they’re well-drained!
- Not Letting Them Cool: Cutting into warm bars leads to messier squares. Give them some time to set and firm up after baking.
With these tips, you’ll create Old-Fashioned Cherry Bars that are sure to impress anyone lucky enough to try them.
Health Benefits and Serving Suggestions
Nutritional Value of Old-Fashioned Cherry Bars
Old-Fashioned Cherry Bars aren’t just delicious; they can also be a wholesome addition to your diet when enjoyed in moderation. Cherries are packed with antioxidants and offer a range of vitamins including C and A. They also provide fiber, which aids in digestion, making them a guilt-free dessert option when indulged in mindfully.
The use of whole ingredients like cherries and butter contributes to a more nutritious dessert than those filled with processed sugars and artificial flavors. While they should remain a treat, these bars can certainly fit into a balanced diet.
Best Ways to Serve and Pair This Dish
These delightful Cherry Bars are fabulous on their own, but they can be paired with various add-ons to enhance your dessert experience.
- Ice Cream: A scoop of vanilla ice cream over warm bars introduces creamy decadence that complements the rustic texture beautifully.
- Whipped Cream: A dollop of freshly whipped cream adds a lightness that balances the sweetness perfectly.
- Coffee or Tea: Serving them alongside a hot cup of coffee or tea makes for a delightful afternoon treat, reflecting that true Southern hospitality.
The freedom to choose how to serve enhances the experience of your Old-Fashioned Cherry Bars, inviting smiles and creating happy memories at every gathering.
FAQ Section
What type of cherries are best for Old-Fashioned Cherry Bars?
While fresh pitted cherries are ideal for their natural sweetness and juice, you can also use frozen cherries for a more convenient option. Just remember to drain them well to avoid soggy bars.
Can I use dried garlic instead of fresh?
For Old-Fashioned Cherry Bars, garlic isn’t a component; perhaps you meant a different dish. Focus on the freshness of the cherries and the butter for this dessert—it’ll make all the difference!
How do I store leftover Old-Fashioned Cherry Bars?
Store leftover bars in an airtight container at room temperature for up to three days. If they stay for longer, refrigerating them can maintain their freshness, but be sure to let them come to room temp before serving.
Can I freeze Old-Fashioned Cherry Bars?
Yes, you can freeze these cherry bars! Just make sure they’re completely cooled, then slice into squares and wrap them individually in plastic wrap. Store them in a freezer-safe container for up to three months, and let them thaw overnight in the fridge when you’re ready to enjoy again.
Conclusion
If you’re like me and hold a special place in your heart for family recipes, you’ll find that Old-Fashioned Cherry Bars bring more than just flavor to the table. They create a sense of connection, nostalgia, and warmth that can motivate anyone to spend time in the kitchen. There’s something comforting about replicating the traditions of our loved ones while adding a little dash of our own flair.
With their delightful blend of sweet and tart, these bars are sure to become a favorite in your home, just as they are in mine. Trust me, you’ll want to make this again and again, savoring each moment spent with loved ones and enjoying the simple pleasure of a homemade treat. Happy baking!
Print
Old-Fashioned Cherry Bars
- Total Time: 55 minutes
- Yield: 12 servings 1x
- Diet: Vegetarian
Description
A nostalgic dessert with a buttery crust and sweet, tart cherry filling, perfect for summer gatherings.
Ingredients
- 2 cups fresh pitted cherries (or frozen, well-drained)
- 1/2 cup unsalted butter, softened
- 1 cup granulated sugar
- 1/4 cup brown sugar
- 2 cups all-purpose flour
- 2 large eggs
- 1 teaspoon almond extract
- 1/2 teaspoon lemon juice
- Powdered sugar for dusting
Instructions
- Preheat the oven to 350°F (175°C).
- Grease a 9×13-inch baking dish or line with parchment paper.
- In a large mixing bowl, beat the softened butter and granulated sugar until creamy. Blend in the eggs and almond extract.
- Gradually add flour and stir until a dough forms.
- Press about two-thirds of the dough into the bottom of the prepared pan.
- In another bowl, mix the pitted cherries with sugar and lemon juice, then pour this mixture over the crust layer.
- Crumble the remaining dough over the cherry filling.
- Bake for 35-40 minutes, or until golden brown and the filling is bubbling.
- Let cool completely, dust with powdered sugar, and cut into squares before serving.
Notes
For extra flavor, consider adding a pinch of cinnamon or nutmeg to the cherry filling. Allow bars to cool for easier slicing.
- Prep Time: 15 minutes
- Cook Time: 40 minutes
- Category: Dessert
- Method: Baking
- Cuisine: American
Nutrition
- Serving Size: 1 bar
- Calories: 250
- Sugar: 20g
- Sodium: 150mg
- Fat: 9g
- Saturated Fat: 5g
- Unsaturated Fat: 3g
- Trans Fat: 0g
- Carbohydrates: 38g
- Fiber: 2g
- Protein: 3g
- Cholesterol: 40mg
Keywords: cherry bars, summer dessert, family recipe, nostalgic dessert